Monday, April 29, 2013

From Drab to Fab~ How to paint your countertops!

When I first moved into my new house, I knew I had a lot of work ahead of me. Updating this over 50 year old cape style house was going to be challenging but I always love a good challenge.
As all of you home owners know, when it comes to large renovations or small ones, it all comes down to money and time. I knew I could make the time but I also knew I wanted to save money for the larger remodels further down the road. So how could I make big changes in this house, without spending a fortune? It started with a lot of paint, and a little imagination, and I can't believe the difference it has already made in my home.
A few weeks ago I tackled the kitchen countertops. I was never a fan of them. Bright swirly blue laminate! A total eyesore every time I walked in there. I knew I couldn't afford to put in a new countertop right away, because I seem to always have expensive taste and I wouldn't want to just settle on something I didn't love. I immediately scoured the internet looking for some ideas and voila! I came across painted countertops. After a lot of research, I headed to Home Depot to buy the supplies I needed, which I will post for you below.
Make sure you give yourself 2 or 3 days for this job, and expect not to have a whole lot of access to your kitchen as I found that it's best to stay out of there so you don't get the countertops covered in bits of hair and fluff and other airborne debris. Trust me I learned this the hard way!
So first things first, before you begin painting, CLEAN, CLEAN, CLEAN, I can't stress that enough. I used a strong cleaner called TSP, that I purchased at Home Depot. Make sure you really scrub those countertops well, because any grime that's on them will affect the way the paint adheres to your countertops. Once you are done with that step, then take some sandpaper or a hand held sander and lightly sand your countertops. I simply used some sand paper, any grit will do. This step just helps the paint go on better. Then once you have sanded it , give it another quick clean and then dry.
The next step is taping! Yes it's tedious, but very necessary. Place the painters tape all along the edges of the countertops, making sure not to place the tape directly on the counters but instead just above them. Also if you want to take extra precaution, put some drop cloths down and along the kitchen cabinets.
Now the painting begins. I first used a primer I had left over from some furniture I painted. I find a good primer really goes along way, and saves you from having to do a lot of top coats. I used Behr Premium Plus Stain Blocking Primer. I did two coats of this and made sure to let it dry for the night.
The next day when it was dry, I began the topcoat. The color I used was another Behr Premium Plus paint. The color is Dolphin Grey. Make sure whatever paint you use is melamine based paint. This is a thicker paint that is meant to be used on cabinets and other high traffic areas. I did two coats of this as well, and let it dry over night.
Once my countertops were painted I was already in love with them, and even though melamine paint is pretty durable, as a mother of a very active 5 year old boy, I wanted to have even more durability, so I purchased an epoxy.
This by far was where my money went. As the epoxy is not cheap. I purchased the Rustoleum Countertop Transformations epoxy which retails for about $59.00.
After carefully reading the instructions and reviews on this project, I was a little bit nervous, as the product has a 30 minute pot life. Which means, once you mix it you have 30 minutes to get it on the countertops before it hardens. I don't have a huge kitchen but I have 3 different areas of countertops so I knew I would have to call in back up for this next step. Luckily my wonderful mother came over and helped me with this final process.
Once the product was mixed, we quickly got to work. The instructions said to immediately pour the epoxy on the surfaces and then using a small foam roller you start evening and spreading it on. It has a self leveling component in it so that was good.
I'm not going to lie, this step was definitely not a walk in the park, and you again don't have to do this, but it's definitely worth it I think. It will take roughly 24 hours to somewhat dry, meaning its still quite tacky, and about a whole 72 hours to completely harden. If I had to do it over again, I would have done a few things differently. I didn't notice any bubbles at first, but once dry I did. If you can catch them right away you can use a blow dryer to get rid of them. I also kept finding little pieces of fluff and hair. Most of which I was able to get out right away but was rather annoying. You see this epoxy will attract anything so you really have to make sure that if you have pets or children that they are no where near the kitchen when using the epoxy.
Here is my before picture, see what I mean by eye sore! And the not so nice periwinkle walls and brass knobs!
And here is my after picture!
I am so happy with the final results. Although the one counter needs to be done again as there are quite a few imperfections that are bothering me, other then that I love it, and all in it cost me under $100 and I have almost new counters to tide me over until I can get new ones.

 
Here is what you will need if you too want to transform your ugly countertops from drab to fab!
 
 
- Foam Rollers
- Painters Tape
- Drop Cloths
- Paint Brush
- Primer
- Melamine Base Paint
- Epoxy (Optional)
- Sandpaper or Hand held sander (Any grit)
- Heavy duty cleaner (i.e. T.S.P)
- A partner in crime if using epoxy
- 3 days at least!
 
And there you guys have it! My painted countertop reveal. What do you think? Please sound off below!



Saturday, March 23, 2013

It's been too long!

Hey everyone,

I just wanted to say first and foremost I am so sorry for missing in action this past year. Life and career has got in the way of being able to keep up with my blog, but I promise that I'm going to get back into the swing of things, and I have lots of great ideas and things to blog about!
    One very exciting thing that I will be blogging about regularly, is that I have purchased my first home. I have been very busy painting and updating my cute as a button Cape style house and I will be posting lots of pictures for you guys to see.
I am looking forward to posting more, and if you guys have any comments, suggestions for me about the blog please let me know!


Tuesday, April 19, 2011

D.I.Y Photo Booth


As soon as I heard about the latest trend happening at weddings and birthday parties I had to blog about it! Imagine having a photo booth at your party or wedding! Well, without the huge rental fees, you can! And all on a d.i.y. budget as a matter of fact!

If you are looking to a have a huge wow factor then enlist the help of a carpenter or a handy man or handy woman to build you a faux wall. Make sure to have several cut outs in the wall for people to take pictures from. You will need some wallpaper of your choice, some frames (just take out the glass and backings) and voila, your very own photo booth. You can hire a photographer or loyal friend to be ready to capture the moments of guests posing!

If you don't have large budget but want to create a simple photo booth, then here are some ideas. Hang a sheet (plain or patterned, depending on theme) on a clothes line or a sturdy wire. This will be your photo backdrop. Next compile a basket full of props, such as; faux mustaches, hats, masks etc. The guests can add some fun to their photos with the props and will give you a good laugh when going through the photos. Instead of hiring a photographer, set your camera up on a tripod with the timer setting on. And voila! Your very own photo booth of memories that will impress all your guests!

I will be doing this for my son's 4th birthday party this summer. His birthday theme will be vintage carnival. The below pictures are my inspiration! I will make sure to post pictures from his party at a later date!

Tuesday, March 8, 2011

Words from a wise wedding planner

For those of you who are in the midst of planning a wedding this post is a must read!
Jacqueline Rogers an event coordinator/wedding planner at Graydon Hall Manor in Toronto, Ontario, has written a guest blog with some advice for the bride and grooms to be out there.


When it comes to planning your wedding day there are a thousand details that need to be discussed and finalized; everything from your date selection to overall design concept, picking your menu and seating your guests in particular seats or generally at a table. Of all the things there are to think about and hammer out, there is one point that clients tend to notice most consistently post-wedding – how quickly the day flew by!

One main thing I suggest to my clients, especially if their ceremony is outside of the church setting, is to have a pre-ceremony reveal. This would be
an intimate moment including bride, groom and photographer. A particular place is chosen at the venue and the groom awaits his bride’s arrival. This can be orchestrated in any number of ways unique to the client. This allows the couple
to share a moment only known to them, and have it documented yet stay unannounced to the guests. You may even wish to have bridal party and family photos taken shortly after, thereby freeing up the entire cocktail hour for you to really enjoy your celebration and mingle with your guests. I find this option is much more favourable than a traditional ‘receiving line’ as guests can enjoy themselves while waiting for an opportunity to share their congrats.

Take deep breaths often, and step to the side now and again through the course of the reception and just take it all in. Those will be some of the lasting memories that stay with you always.


~Special thanks to Jacqueline Rogers. Pictures courtesy of Graydon Hall Manor.~

Tuesday, February 22, 2011

D.I.Y Wall Decor

If you are anything like me then you probably get bored of having the same decor and accessories in your home for long periods of time..
well instead of splurging on expensive art or wall decor that you may tire of, why not make your own!!
That's right, the latest craze right now is d.i.y wall decor.
And even if your are not the most creative or artistic person it doesn't matter because there are many simple and easy to do wall art that doesn't require any Picasso skills.
The possibilities are endless but I have compiled a few of my favorite d.i.y's;

Thursday, February 17, 2011

FIND OF THE WEEK- Floor to Flor

As most parents or animal owners can attest to, carpets are not always child or doggy friendly!
But now with this latest find we can have the style and save ourselves (and our backs) from constantly scrubbing out stains.


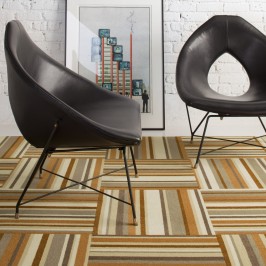
This innovative and genius company makes mix and match tile-sized squares of carpet that you can buy individually and then arrange any way you want to.(prices starting at $7 per tile). You can use them to create anything from an area rug to a wall-to-wall floor covering.

And here's the best part: When the juice gets spilled, just remove the stained tile and give it a wash in the sink. Stain won't come out! Then swap out with the old and in with the new.

Check it out at www.flor.com

Sunday, January 30, 2011

Celebrity Room of the Day!

One of the most photographed, googled person right now is none other than the curvy fashionista Kim Kardashian. Most famous for, well being famous I guess!
But whether or not her relevance could be questioned, we can't help but be drawn to her style. But it's not just her clothing that is stylish and impressive, but also her digs!
Check out this photo of her living area in her posh beverly hills home.
Kims style is very contemporary with a hint of modern elements.

Friday, November 26, 2010

Thursday, January 21, 2010

Treat of the Day

Coconut Tres Leches Hot Chocolate

On a cold winters night who wouldn't want to curl up on the couch with a hot cup of cocoa.
Well here's a twist on the classic recipe.
Enjoy!


Ingredients:

3 cups fat-free milk
1 14-oz. can unsweetened coconut milk
1/2 of a 14-oz. can sweetened condensed milk (2/3-cup)
2 Tbsp. unsweetened cocoa powder
1/2 tsp. vanilla
Sweetened whipped cream (optional)
1/4 cup chocolate shavings (optional)


Directions
1. In medium saucepan combine fat-free milk, coconut milk, and sweetened condensed milk. Bring to a simmer over medium-low heat, stirring occasionally. Whisk in cocoa powder until well-combined.
2. Remove from heat; stir in vanilla. Serve in mugs topped with whipped cream and chocolate shavings. Makes 5 (1-cup) servings.


Nutrition Facts:
Calories 445, Total Fat (g) 26, Saturated Fat (g) 20, Monounsaturated Fat (g) 3, Cholesterol (mg) 33, Sodium (mg) 137, Carbohydrate (g) 43, Total Sugar (g) 37, Protein (g) 11, Vitamin C (DV%) 2, Calcium (DV%) 33, Iron (DV%) 8, Percent Daily Values are based on a 2,000 calorie diet

Celebrity Room of the Day


This is the cottage of musical sensation Kenny G. It is located in the Muskoka region of Ontario. It is a very popular place for other celebrity cottagers such as Goldie Hawn and Kurt Russell.
Kenny's cottage has many rustic and contemporary elements. I would say his style is Rustic Lodge Chic.The dark wood cabinetry in the kitchen with the stainless steel appliances are where the contemporary comes in. The stone fireplace, wooden furniture and mosquito netting over the bed are more of the rustic features of the cottage.  With all these components, this cottage gives off a easy going, relaxed atmosphere.

Coolest Find of the Day


Smart Tiles

A revolutionary and unique product that is as easy to install as peel and stick! The do it yourself peel and stick tile concept of smart tiles is made of an adhesive substrate topped with a clear gel component called Gel-0™ (which gives it its 3-dimensional effect) that makes the product so easy to handle, cut and maintain you will wonder why this was not invented before. They are installed in minutes without any mess or specialized tools over any clean and sleek surface for you to enjoy right there and then. Especially designed for kitchen and bathroom environments (ie. backsplashes), they are resistant to the heat of stovetops and the humidity of bathrooms. They are removable by simply heating the surface with a hairdryer and peeling them off. Makes life a lot easier! Visit the website http://thesmarttiles.com/ and check them out.
They are currently available in most Home Depot stores.


A great alternative to those renters out there who want to jazz up their kitchens and bathrooms without no muss and no fuss, and no angry landlords! And perfect for home owners who don't want to go through the costly hassle of ripping out ugly tiles in your house!


Tuesday, January 19, 2010

D.I.Y Decor

How to: Create a wonderful winter foyer


By Style at Home's Christine Hanlon

Photography by Lara Fishbein 


Creative suggestions for making your front foyer a space that gets noticed.


Too often, the foyer is just a space to pass through. Instead, make it the perfect place to create a statement and add subtle holiday magic.


Here's how to achieve this look.


*Courtesy of Style at Home Canada*


Monday, January 18, 2010

Coolest Find of the Day


When you were little, did you ever look up at the sky and try to find clouds that looked like things or letters.
Well now that same sort of idea has emerged into photographic art.
You now can turn your own words or names into beautiful art, and it's just a click away.
Alphabet Photography™ is the work of Jennifer Blakeley. Jennifer and her husband Sam run the business together, along with other members of their close-knit team. Jennifer and her team take photographs of different structues and architecture, that mimic letters. They then turn them into inspirational sayings. Alphabet Photography is based in Niagara Falls, Ontario, Canada.
Check out the website http://www.alphabetphotography.ca/index.aspx
Any room, in any home would look great with one of these pieces in it.

Celebrity Room of the Day


This is the bedroom of Demi Moore. It is very sleek, very modern and looks to be inspired by nature.
The large sliding door windows open up to a gorgeous view of the greeny outdoors. All these elements peace together a room full of calmness and serenity

Winter Wedding


I have to say that I'm not really a winter person.  Between the horrible driving conditions and the amount of effort you have to put in just to get out the door and not freeze to death is enough to make me want to hibernate for the entire winter season. However now more than ever a lot of people are choosing to get married in the winter months. And although maybe it is not my favorite time of year, there is something very magical about it.  For your wedding you can make some absolutely beautiful table arrangements by using all that nature has to offer. It's not just about flowers either. You can do centrepieces of tall glass vases with twigs cascading out. The curlier the twigs the more whimsical it'll look.  What about pinecones as your name holders for the guests. If you don't want to go overboard on the earthy look, than try spray painting them in a nice metallic color. Silver is a great color for winter that goes with almost any decor.


Some great color combinations for a winter wedding are; light blue and silver, scarlett red and white, red and light green.